Neural DSP サポート
お困りごとの解決方法が見つかりませんか? support.japan@neuraldsp.com までお気軽にご連絡ください。喜んでサポートいたします!
Cortex Control User Manual (2026.1.21)
Table of Contents
-
Cortex Control App
- App Setup
- System Requirements
- File Locations
- App Startup
- Automatic Version Check
- User Interface
- Parameter Editors
- Contextual Menus
- Master Volume Mismatch
- Neural Capture Version 2
- Tube Amplifier Warning
- Cloud Auto-Save
- User Content Transfer
- Legacy Plugin Presets Importing
- Impulse Response Truncation
- Local Backups
- CorOS Updates via USB
- During a CorOS Update...
- Keyboard Shortcuts
Cortex Control App
Cortex Control is a fully integrated desktop application that allows you to manage every feature and setting of your Quad Cortex via USB.
It provides a clear, intuitive interface for organizing Presets, Neural Captures, Impulse Responses, and device settings, making management faster and more efficient.
App Setup
INSTALLATION
Download the latest version of Cortex Control from our official website and run the installer to complete the installation process. Cortex Control is available for both macOS® and Windows®.
UPDATES
To update Cortex Control, download the latest version from the official website and run the installer. There is no need to uninstall the previous version, as your existing files will be automatically overwritten during the installation process.
UNINSTALLATION
-
On macOS®, uninstall Cortex Control by manually deleting its files from their respective folders.
-
On Windows®, you can uninstall Cortex Control via the Control Panel or by selecting the Remove option in the installer.
System Requirements
Cortex Control requires a Quad Cortex connected to your computer via USB. Standalone operation is not supported.
Any Windows® or Apple® computer capable of audio processing is supported. On Windows® computers, the Quad Cortex ASIO® audio driver must be installed before using Cortex Control.
MACOS® MINIMUM REQUIREMENTS
-
Intel Core® i5 (4th generation or higher).
-
Apple® Silicon (M1 or higher).
-
8 GB RAM or more.
-
macOS® 13 Ventura (or higher).
WINDOWS® MINIMUM REQUIREMENTS
-
Intel Core® i5 (4th generation or higher).
-
8 GB RAM or more.
-
Windows® 10 (or higher).
-
Latest Quad Cortex® ASIO® audio driver.
Cortex Control™ requires 100 MB of free storage space.
File Locations
Cortex Control is installed in the default directories unless a custom installation location is selected during setup.
MACOS® DEFAULT DIRECTORIES
-
Standalone App: Macintosh HD/Applications/Neural DSP/
-
Settings Files: <User Folder>/Library/Application Support/Neural DSP/Cortex Control
-
Local Backups: <User Folder>/Library/Application Support/Neural DSP/Backups
WINDOWS® DEFAULT DIRECTORIES
-
Standalone App: C:\Program Files\Neural DSP\Cortex Control
-
Settings File: C:\Users\<Your Profile>\AppData\Roaming\Neural DSP\Cortex Control
-
Local Backups: C:\Users\<Your Profile>\AppData\Neural DSP\Backups
App Startup
When you first launch Cortex Control, the application checks if a device is connected to your computer via USB.

Connect your device via USB and wait for the application to complete startup.

Automatic Version Check
Cortex Control automatically checks for firmware compatibility upon startup.
If a version mismatch is detected, a pop-up window will appear with the option to download and install the latest available version.
User Interface
The Cortex Control user interface provides a streamlined, desktop-based experience for managing every aspect of your Quad Cortex.
From the main window, you can access The Grid, browse and organize content via the Directory, and adjust device settings.
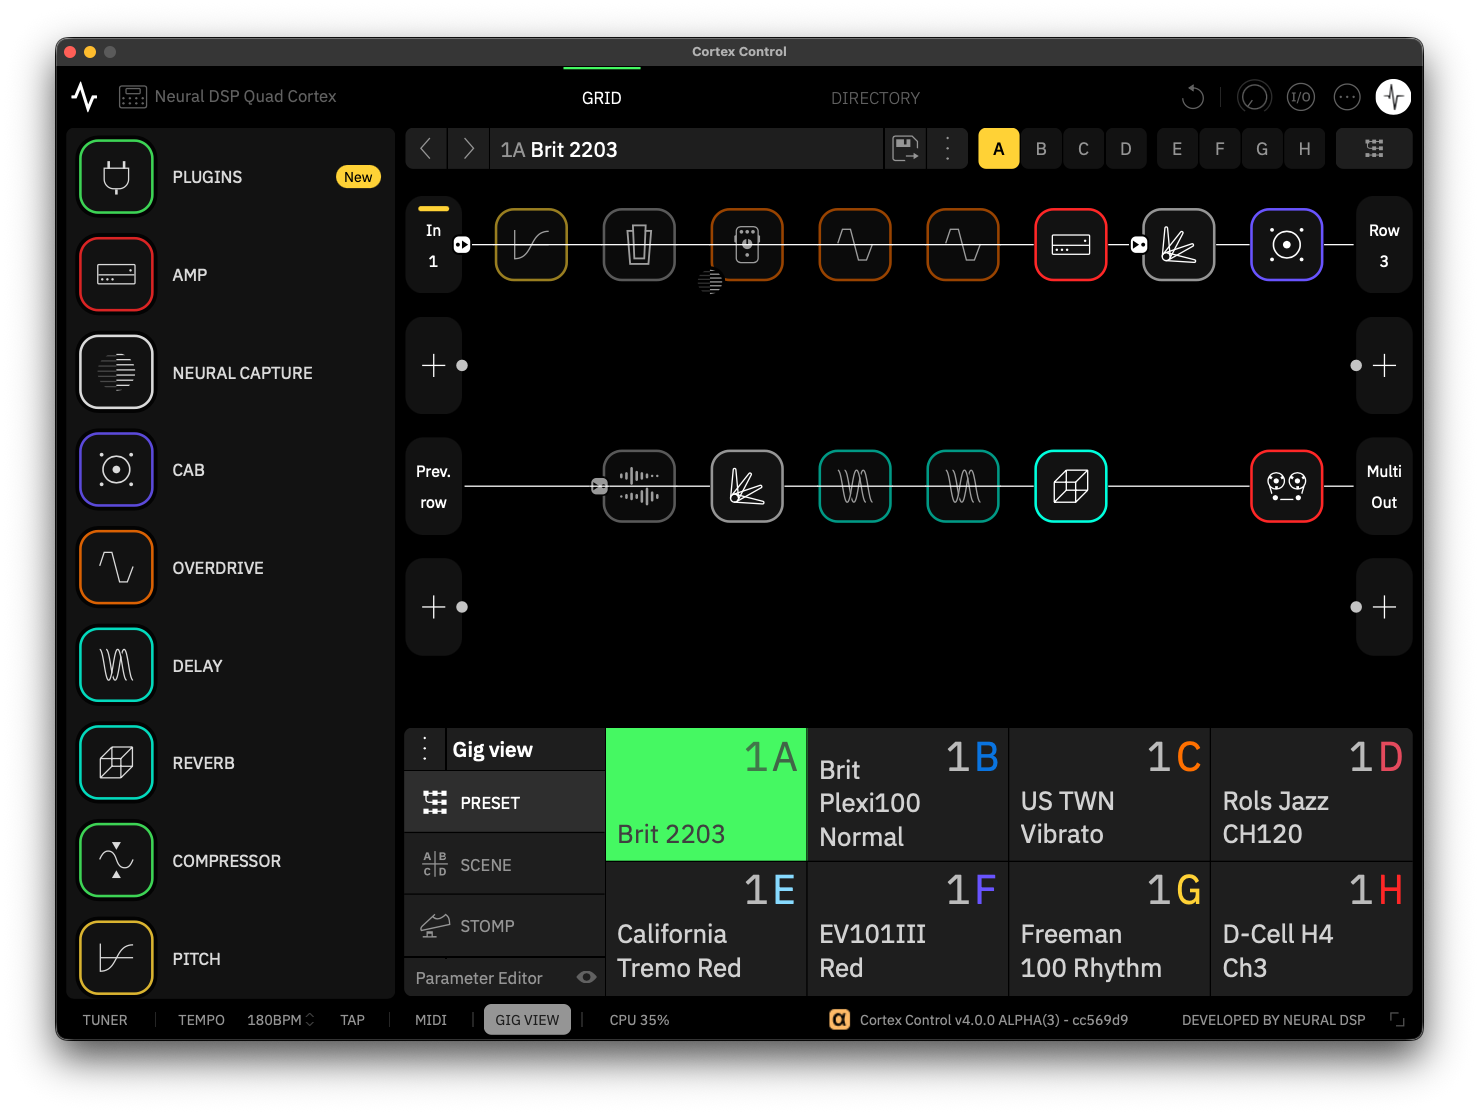
GRID

Cortex Control features an intuitive and expanded version of The Grid, giving you a clear overview of the current active Preset. The Grid displays your virtual devices, signal routing, parameter values, active Scene, Tempo, and CPU usage.

You can start building a Preset by clicking an empty slot on The Grid to add your first device block from the Virtual Device List. Additionally, you can drag-and-drop devices directly from the Virtual Device List onto The Grid.
Parameter Editors
The Parameter Editors expand or collapse depending on the selected item. The Grid always remains visible to ensure an uninterrupted editing experience.
DIRECTORY

The Directory provides a complete overview of all your content, including Presets, Neural Captures, Impulse Responses, and Plugin Presets. The Directory is designed for fast navigation, allowing you to browse, search, and manage all factory and user content on your device.

From the Directory, you can load items, upload or download content to and from Cortex Cloud, and organize your library using folders, setlists, and subfolders. You can also favorite, rename, duplicate, or delete content directly from the Directory interface.
Contextual Menus
Right-click items on the Directory to quickly access relevant actions while keeping the Directory view visible for seamless content management.
BOTTOM UTILITY BAR

The bottom utility bar in Cortex Control provides quick access to essential tools, making it easy to switch between views and adjust settings without leaving The Grid or Directory.
-
TUNER: Click to open the Tuner menu.
-
TEMPO: Click to access the Tempo and Metronome menu. You can set tempo values per Scene, Preset, or globally.
-
BPM: Displays the current tempo value. Click to enter a custom BPM with your keyboard, or click and drag vertically to adjust it.
-
TAP: Sets the tempo value by clicking. The BPM is based on the interval between your last two clicks.
-
MIDI: Click to open the Preset MIDI Out menu.
-
GIG VIEW: Click to toggle the Gig View on both the device and Cortex Control.
-
CPU: Toggles the CPU Monitor. When enabled, it displays overall CPU usage per device block and the current bypass state of GLOBAL EQ and INPUT GATES.
-
WINDOW SIZE: Resizes the Cortex Control window to different window sizes. The app will remember your selection when reopened. Additionally, you can also drag the edges of the window for continuous resizing.
MASTER VOLUME BEHAVIOR

The Master Volume Knob in Cortex Control adjusts the overall output level of the connected device. Click and drag the knob upward to rotate it clockwise and increase the volume, or drag downward to rotate it counterclockwise and lower the volume.

Master Volume Mismatch
The volume level displayed in Cortex Control may not always match the physical Master Volume on your device. When this occurs, the hardware volume wheel is temporarily deactivated to prevent sudden volume changes.
To re-sync the Master Volume, adjust the volume on your device until it matches the level shown in Cortex Control.
QUAD CORTEX DEVICE NAME

The selected name and hardware type are displayed in the upper-left corner of the Cortex Control app. Click this area to customize the Quad Cortex device name. Press ENTER or click anywhere else in the app window to save your changes.
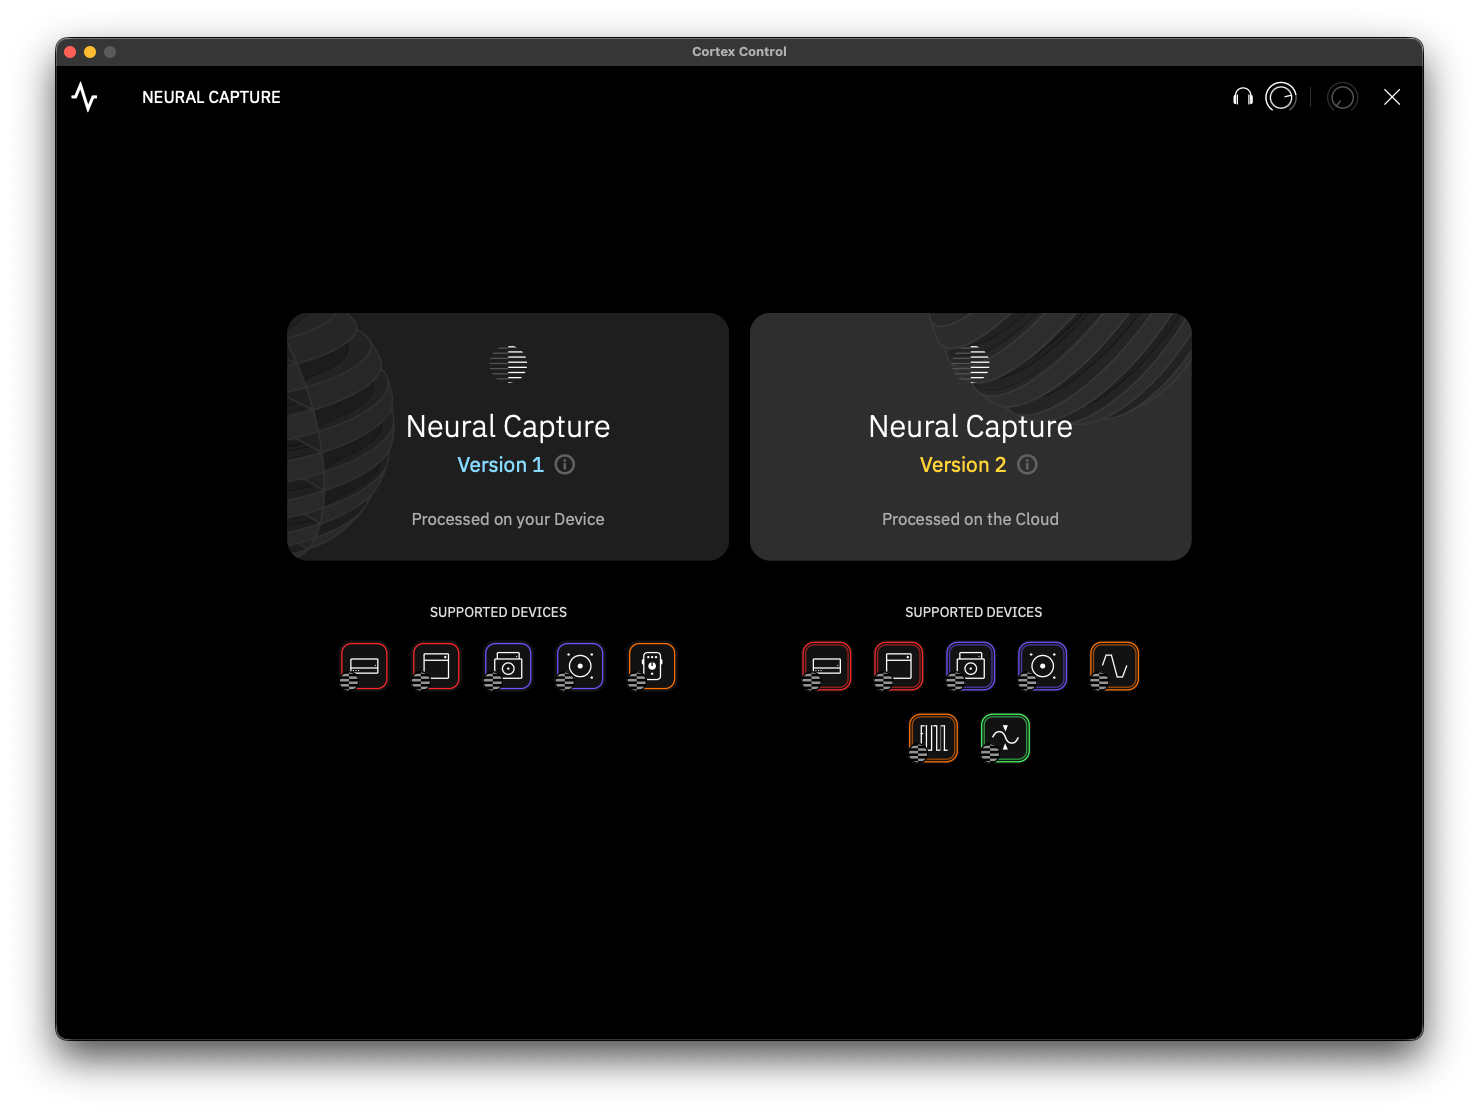
Neural Capture Version 2
Neural Capture is a powerful tool that can learn and replicate the sonic characteristics of any amplifier, cabinet, or overdrive pedal with accuracy and realism.

Neural Capture Version 2 is an advanced evolution of Neural Capture trained via Cortex Cloud. This option provides even higher-resolution Captures, making it especially powerful for touch-sensitive devices like fuzzes, compressors, and certain styles of amps, while still excelling at everything that Neural Capture Version 1 does.
To create a Neural Capture, you will need to connect an overdrive pedal, mic a cabinet, or connect an amplifier through a reactive load box to your Quad Cortex. Once created, it can be inserted and used as a block on The Grid.

Tube Amplifier Warning
Connecting the speaker output of a tube amplifier directly to the Quad Cortex can cause serious damage to both devices. To ensure safe operation:
-
Use the D.I. output of the captured amplifier while keeping it connected to a speaker cabinet, or…
-
Connect a reactive load box between the amplifier’s speaker output and the Quad Cortex.
FEATURE ACCESS
-
Open the Cortex Control app and log in to your Neural DSP account.
-
Open the app’s contextual menu and select New Neural Capture.
-
When prompted, choose Neural Capture Version 2 to begin the process.
CAPTURE PROCESS
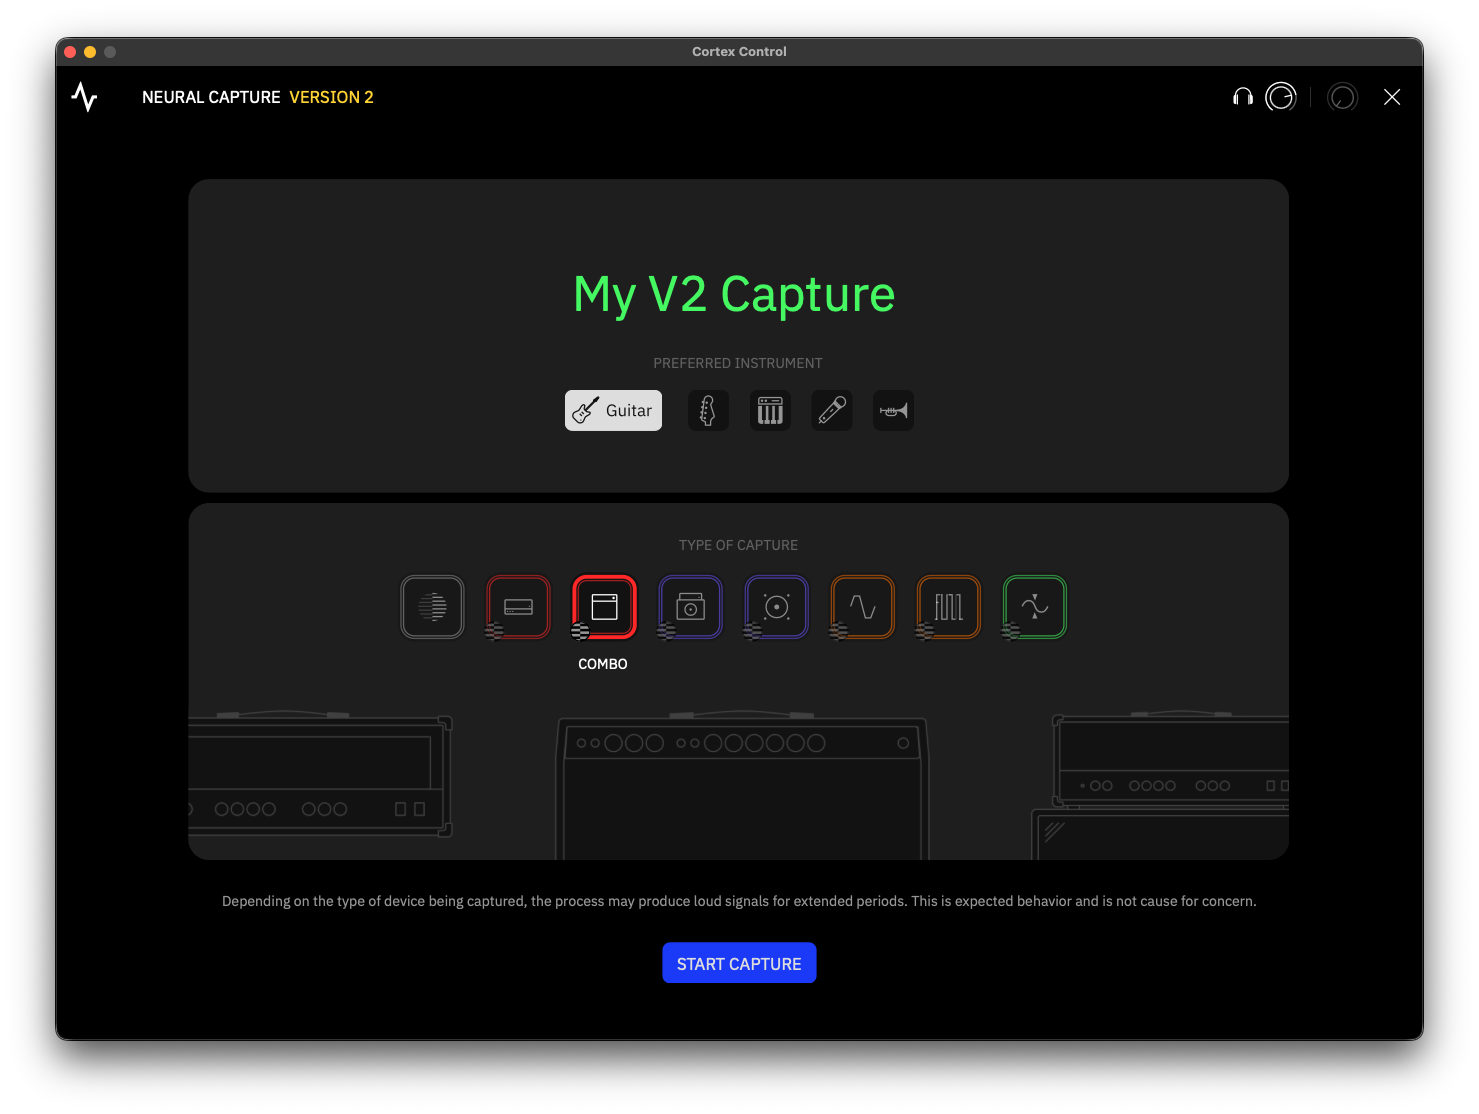
When performing a Neural Capture Version 2 for the first time, Cortex Control may request permission to access your microphone. This is required because Cortex Control acts as the bridge between the Cortex Cloud and your connected device. Additionally, Windows® users must install the latest public audio driver for proper functionality.
-
Connect your devices by following the on-screen instructions. Once in the Neural Capture Calibration menu, set the levels and click FILL METADATA.
-
For Neural Capture Version 2, filling in the metadata of your target device in advance helps optimize the training process.
-
Click START CAPTURE and wait a few minutes for the process to complete.
-
Once completed, review the results in the A/B TEST menu, then click SAVE NEURAL CAPTURE to store it on your device.
Cloud Auto-Save
By default, all Neural Capture Version 2 files are automatically saved to the user’s Cortex Cloud profile as private items. Neural Capture V2 training is performed in the Cloud, and the user’s profile serves as the default storage location so that Quad Cortex can download the captures afterward.
Neural Capture Version 2 F.A.Q.
This section addresses the most common questions about Neural Capture Version 2.
-
Do Neural Capture Version 2 blocks look different on The Grid?
Version 2 blocks feature a distinct double-layered contour, making them easier to identify on The Grid compared to Version 1. Both versions of Neural Capture™ blocks share the same parameter editor layout.
-
How many Captures V2 sessions can be performed daily?
Each user can currently perform up to 40 Neural Capture Version 2 sessions per day.
-
How long do Neural Capture Version 2 sessions take to complete?
Each session typically takes around 10 minutes to complete.
-
Where is the “Auto-Set” switch?
The “Auto-Set” switch has been removed from both Neural Capture Version 1 and Version 2 workflows. Tooltips have been added to the IN 1 and IN 2 parameters in the Neural Capture calibration menu, guiding how to configure optimal settings before starting the capture process.
-
I keep getting the message “There was an issue with the recorded audio”. What can I do?
First, ensure that all cables are connected correctly as shown in the Connection Diagram and that Cortex Control has the necessary microphone permissions. You should also confirm that the macOS Voice Isolation feature is disabled in the Control Center. Additionally, remember that third-party applications using your audio devices in the background may interfere with Neural Capture Version 2. If the issue persists, please contact Support for further assistance.
-
Does Neural Capture Version 2 support Compressor Devices?
Yes. Neural Capture Version 2 can successfully capture compressor devices. However, based on our internal tests, captures made on compressors with aggressive threshold settings and long release times may start producing results that differ from the original hardware signal. Users are encouraged to experiment with different settings to achieve the most accurate results.
-
How does gain metadata work with Compressor Devices?
Gain estimation is based on the device’s dynamic range and the amount of harmonic content it produces. This method applies to compressors as well. However, since compressors typically generate less harmonic content than high-gain amplifiers or fuzz pedals, their estimated gain values will appear lower.
-
My recently made Capture does not sound as expected. Is there any way to improve it?
Neural Capture Version 2 achieves greater accuracy compared to Neural Capture Version 1, especially in reproducing dynamic nuances and subtle tonal details.
If you find that a Capture does not have as much gain as you would like, it is best to create a new Capture with higher gain settings on the original device rather than boosting the block parameters (for example, setting its GAIN to +24dB). This approach ensures more authentic results.
If you experience issues with your Neural Capture Version 2 devices, we recommend performing the capture again to ensure optimal results.
User Content Transfer
You can quickly import and organize your plugin Presets on the Quad Cortex via Cortex Control.
PLUGIN PRESETS TRANSFER

To import user plugin Presets, simply drag-and-drop the corresponding XML files directly into the User Presets area of the Cortex Control interface. Third-party Impulse Responses (IRs) used in plugin presets are automatically imported during the transfer.
Legacy Plugin Presets Importing
Legacy user Presets must be resaved in their respective Plugin X versions before they can be imported.
IMPULSE RESPONSES TRANSFER

To import Impulse Responses (IRs), simply drag-and-drop the corresponding WAV files directly into the IRs Library in the Cortex Control interface.
Impulse Response Truncation
Any compatible Impulse Response file (WAV) can be uploaded to Cortex Cloud regardless of its original length. Once uploaded, files are automatically resized to 1024 samples (approximately 21 ms).
Local Backups
Local backups in Cortex Control are complete snapshots of your device content and settings stored on your computer. A backup includes all Presets, Neural Captures, impulse responses, Setlists, and device configurations, allowing you to restore your Quad Cortex to a previous state at any time.
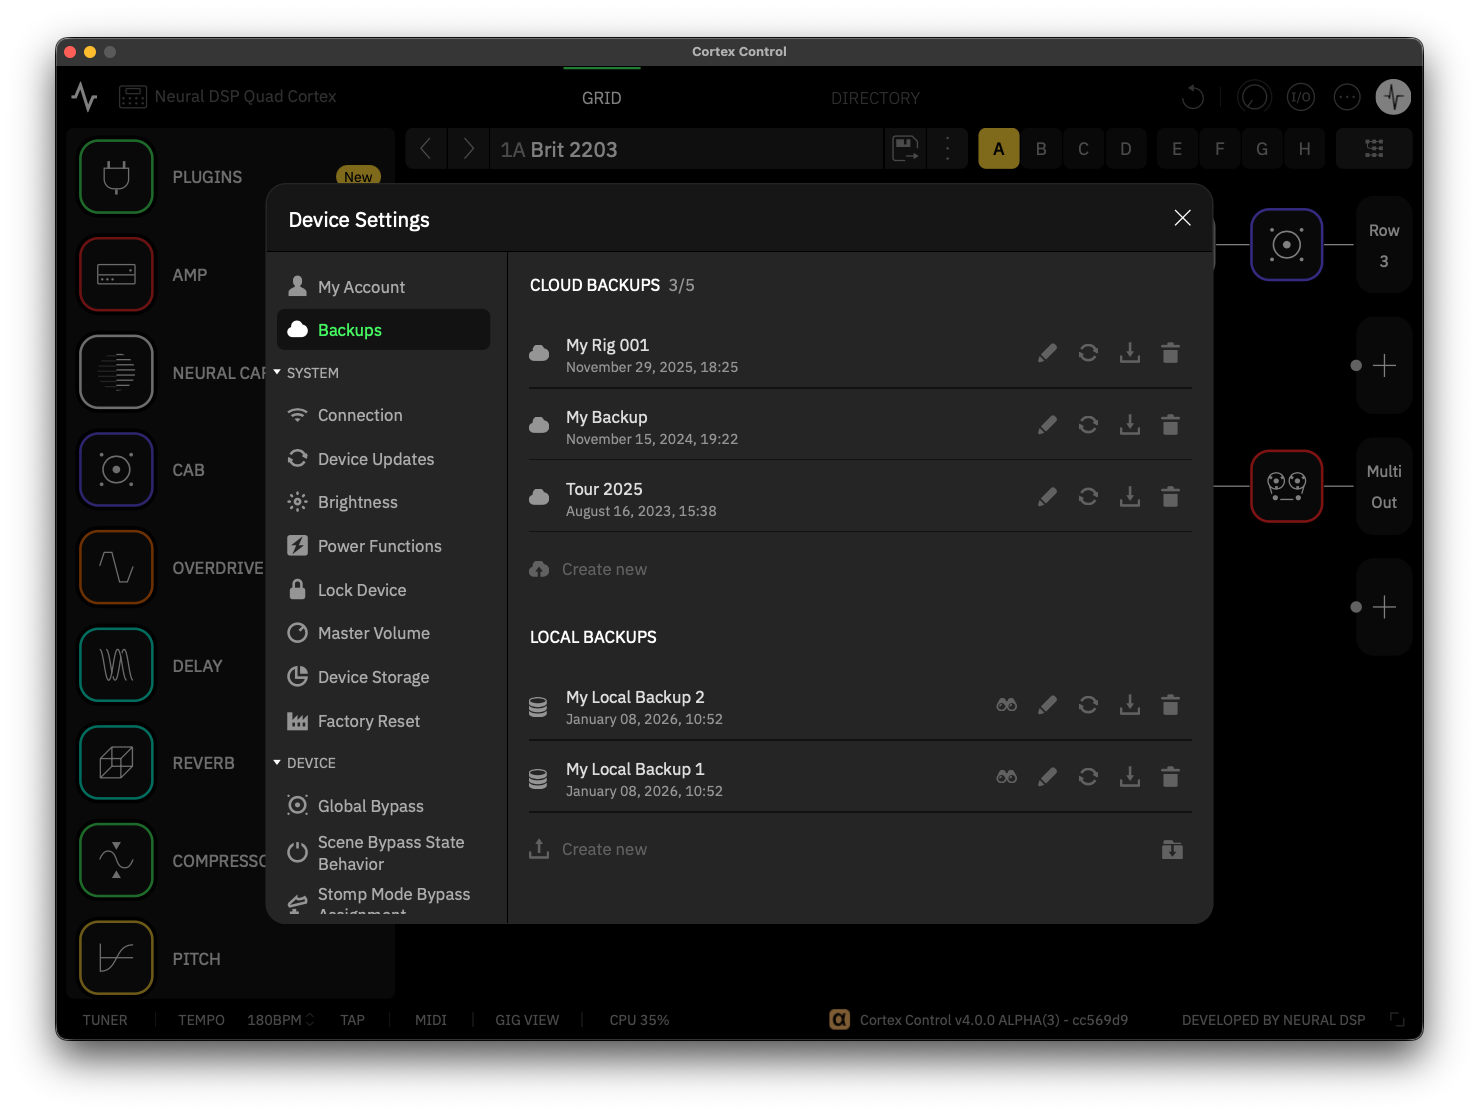
Local backups are saved directly to your computer’s storage, so they do not require an internet connection. You can create as many backups as your available storage allows.
BACKUP OPTIONS
-
SEARCH BACKUP: Opens the folder on your computer where local backups are stored.
-
EDIT BACKUP: Renames the selected backup.
-
UPDATE BACKUP: Updates an existing backup with the current content and settings from your device.
-
DOWNLOAD BACKUP: Restores the selected backup to your device, replacing its current content.
-
DELETE BACKUP: Permanently removes the selected backup from your computer.
LOCAL BACKUP DIRECTORIES
-
MACOS®: <User Folder>/Library/Application Support/Neural DSP/Backups
-
WINDOWS®: C:\Users\<Your Profile>\AppData\Neural DSP\Backups
CorOS Updates via USB
Keeping Cortex Control and Quad Cortex up to date ensures optimal functionality. To update your Quad Cortex via USB:
-
Go to Device Settings > Device Updates and click Check for Updates.
-
If an update is available, Cortex Control will automatically transfer the CorOS update to your device via USB.
-
For faster installation, we recommend updating over Wi-Fi. To switch methods, cancel the USB transfer, disconnect your device from the computer, and restart the update directly on your device.
During a CorOS Update...
-
The touchscreen and footswitches will be temporarily disabled.
-
Audio processing will be unavailable.
-
Do not remove the power cable or turn off your device.
Keyboard Shortcuts
Cortex Control has a range of keyboard shortcuts designed to speed up navigation and streamline editing.
GLOBAL SHORTCUTS
SHOW GRID
• MacOS®: CMD + 1
• Windows®: CTRL + 1
SHOW DIRECTORY
• MacOS®: CMD + 2
• Windows®: CTRL + 2
RESIZE APP WINDOW
• MacOS®: CMD + 7/8/9
• Windows®: CTRL + 7/8/9
UNDO ACTION
• MacOS®: CMD + Z
• Windows®: CTRL + Z
REDO ACTION
• MacOS®: SHIFT + CMD + Z
• Windows®: SHIFT + CTRL + Z
COPY
• MacOS®: CMD + C
• Windows®: CTRL + C
PASTE
• MacOS®: CMD + V
• Windows®: CTRL + V
GRID SHORTCUTS
GRID SLOT NAVIGATION
• MacOS®: LEFT, UP, RIGHT, DOWN ARROWS
• Windows®: LEFT, UP, RIGHT, DOWN ARROWS
NEW PRESET
• MacOS®: CMD + N
• Windows®: CTRL + N
SAVE PRESET
• MacOS®: CMD + S
• Windows®: CTRL + S
SAVE AS…
• MacOS®: SHIFT + CMD + S
• Windows®: SHIFT + CTRL + S
SCENE RECALL
• MacOS®: OPTION + 1, 2, 3… 8.
• Windows®: ALT + 1, 2, 3… 8.
EDIT USER PRESET DETAILS
• MacOS®: CMD + E
• Windows®: CTRL + E
TOGGLE GIG VIEW
• MacOS®: CMD + G
• Windows®: CTRL + G
PRESET MIDI OUT
• MacOS®: SHIFT + CMD + M
• Windows®: SHIFT + CTRL + M
SELECTED BLOCK BYPASS TOGGLE
• MacOS®: B
• Windows®: B
BLOCK HOVER BYPASS
• MacOS®: MOUSE HOVER + B
• Windows®: MOUSE HOVER + B
REMOVE SELECTED BLOCK
• MacOS®: BACKSPACE
• Windows®: BACKSPACE
VIRTUAL DEVICE LIST SHORTCUTS
TOGGLE DEVICE LIST
• MacOS®: CMD + DOT
• Windows®: CTRL + DOT
PREVIOUS VIRTUAL DEVICE
• MacOS®: CMD + ARROW UP
• Windows®: CTRL + ARROW UP
NEXT VIRTUAL DEVICE
• MacOS®: CMD + ARROW DOWN
• Windows®: CTRL + ARROW DOWN
DIRECTORY SHORTCUTS
SEARCH ITEM
• MacOS®: CMD + F
• Windows®: CTRL + F
LOAD SELECTED ITEM ON THE GRID
• MacOS®: ENTER
• Windows®: ENTER
LOOPER X SHORTCUTS
RECORD
• MacOS®: OPTION + 1
• Windows®: ALT + 1
PLAY/STOP
• MacOS®: OPTION + 2
• Windows®: ALT + 2
REVERSE
• MacOS®: OPTION + 3
• Windows®: ALT + 3
UNDO
• MacOS®: OPTION + 4
• Windows®: ALT + 4
DUPLICATE
• MacOS®: OPTION + 5
• Windows®: ALT + 5
ONE SHOT
• MacOS®: OPTION + 6
• Windows®: ALT + 6
HALF SPEED
• MacOS®: OPTION + 7
• Windows®: ALT + 7
PUNCH IN/OUT
• MacOS®: OPTION + 8
• Windows®: ALT + 8

カート
現在、カートには商品が入っていません。
ショッピングを始める